|
|
||||||
|
|
|
|
Download | |||
Diamond Version 5 User Manual: Display of structure pictureModelsThis article in brief:
Previous article: Rendered and flat representation Overview
For the visualization of 3D chemical structures, different models are in use: The wire model is limited to the representation of bonds, whereas atoms are only represented as terminal points of the bonds. The wire model displays only the bonds as thin lines with the colors of the bonded atoms in parts. Non-bonded atoms are displayed as dots. This model requires defined bonds, a condition that is often not fulfilled, even in inorganic compounds. It allows a very good overview on the bonding geometry and is the method of choice for molecular structures, but the space filling of a structure cannot be represented. In rendered mode, wires can be represented as sticks (tubes) instead. In the ball-and-stick model atoms are represented as spheres and bonds are drawn as sticks or lines. This is the default model of Diamond. The ellipsoid model is a variant of the ball-and-stick model where the atoms are not drawn as spheres but as ellipsoids - provided that anisotropic displacement parameters are given for the corresponding atom sites. The bonds are drawn like in ball-and-stick-model. The space-filling model does not show any bonds but atoms only, where van-der-Waals radii are used so that the spheres touch or interpenetrate. This model allows a good impression of the space filling aspects of the structure, whereas constitutions and coordination relationships are difficult to recognize. The space-filling model can also be superimposed on another model.
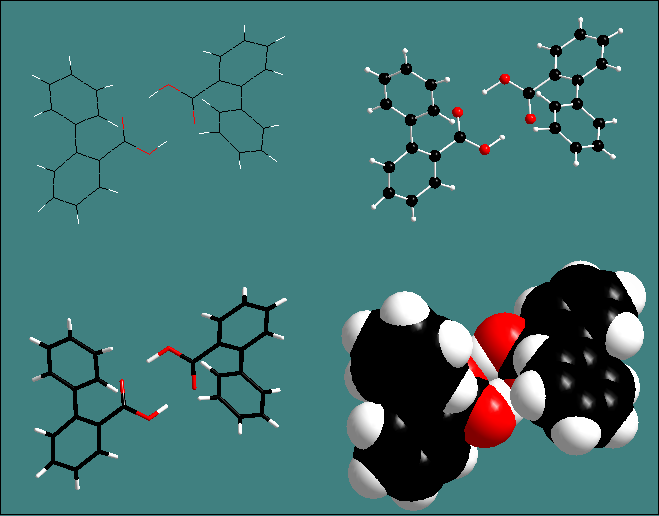
The following illustration compares four representations of the same structure picture using wire (upper left), sticks (lower left), ball-and-stick (upper right), and space-filling model (lower right):
Reference:
Name
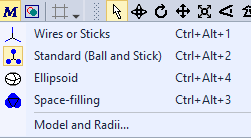
Switching the modelThe Models button (the M symbol) in the Picture toolbar offers a quick and easy access to the available models:
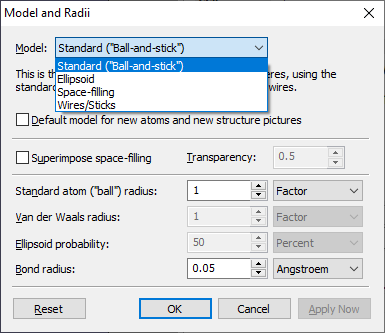
Please note that the commands from the Models menu from the Picture toolbar are "short keys" ("hot keys", "accelerator keys") for a quick-and-easy switch between models. The commands apply to all atoms and bonds in the structure picture, unless at least one atom or bond is selected. If on the other hand atoms and/or bonds are marked as selected in the structure picture, the command will apply only to this portion of the picture, whereas the residuals (not marked) atoms and bonds keep their model. Model and Radii dialogThe Model and Radii dialog, which is available through the corresponding command in the Display menu, offers additional options and adjustments of the radii of atoms and/or bonds, depending on the used model:
Note: This dialog is only available, if there are already atoms in the structure picture. In a blank picture, there is only a Default Model dialog to set the model for the atoms to be created, whereas there are no options at that time to adjust radii. Ball-and-Stick Model (Regular Model)The ball-and-stick model is the default model of Diamond. To activate the ball-and-stick model, click on the Models button (the M symbol) in the Picture toolbar, which opens a menu, where you choose the Standard (Ball-and-stick) command. The symbol for ball-and-stick model is highlighted (yellow), if this model is the active one. The radii of the atoms as well as the radii of the bonds can be scaled with the factors given at Standard atom ("ball") radius and Bond radius, rsp. The radii of the atoms (usually depending on atom type) are defined under Atom Designs from the Display menu, the bond radii under Bond and Contact Designs, also from the Display menu. For details, see the articles "Designing atoms" and "Designing bonds and contacts", rsp. Ellipsoid ModelThe ellipsoid model is closely related to the ball-and-stick model. Whereas in the ball-and-stick model atoms are drawn as spheres (i. e. with isotropic extension in all three dimensions of space), atoms are distorted to ellipsoids (i. e. have anisotropic distortion in 3D space) depending on the anisotropic displacement parameters given with the atomic parameters. If only isotropic or equivalent or no displacement parameters are given, the atom is drawn as a sphere. Bonds are drawn anyway in the same way as in the ball-and-stick model. To activate the ellipsoid model, use the Ellipsoids command in the Models menu described above. Like for the ball-and-stick model this applies to all atoms and bonds unless individual atoms and/or bonds have been marked as selected in the structure picture! You can change the size of the ellipsoids via the Ellipsoid probability in the Model and Radii dialog, for example "ellipsoids are drawn with 50 percent" or "... with 90 percent probability". There are a lot of styles available that are important to visually distinguish different atom types and to emphasize the orientation of the principal axes of the displacement parameters in the ellipsoid representation, whereas the atoms in ball-and-stick and space-filling model usually use simple solid spheres. Thus the ellipsoid representation is described in more detail in a separate article: "Drawing ellipsoids". Wire Model
The wire model is limited to the representation of bonds, whereas atoms are only represented as terminal points of the bonds.
The wire model displays only the bonds as thin lines with the colors of the bonded atoms in parts. Non-bonded atoms are displayed as dots.
This model requires defined bonds, a condition that is often not fulfilled, even in inorganic compounds.
It allows a very good overview on the bonding geometry and is the method of choice for molecular structures. To activate the wire model, use the Wire or Sticks command in the Models menu described above. Like for the ball-and-stick model this applies to all atoms and bonds unless individual atoms and/or bonds have been marked as selected in the structure picture! Using Sticks Instead of Thin Wires
When using rendered representation,
wires can be displayed as sticks (or tubes) instead. These sticks have the colors of the bonded atoms in parts and are rounded at the terminal points. To change between wires and sticks representation, choose the Model and Radii command from the Display menu, where you can define the (bond) radius for sticks in Angstroem or as scaling factor in the Bond radius input field. A value of zero turns sticks into wires and a value greater than zero turns wires into sticks. Space-Filling Model
The space-filling model does not show any bonds but atoms only, where van-der-Waals radii are used so that the spheres touch or interpenetrate. This model allows a good impression of the space filling aspects of the structure, whereas constitutions and coordination relationships are difficult to recognize. To activate the space-filling model, use the Space-filling command in the Models menu described above. Like for the ball-and-stick model this applies to all atoms and bonds unless individual atoms and/or bonds have been marked as selected in the structure picture! To edit the radii, you can use the Model and Radii dialog or the Atom Groups and Sites Designs dialog. Superimposition of Space-Filling Model
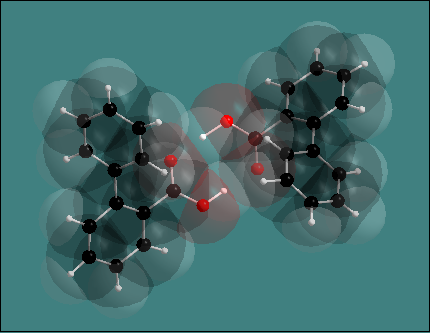
You may draw a space-filling model over the regular wire or ball-and-stick model. Normally transparency will be used for this overlaid model. To change the settings for a superimposition of a space-filling model, use the above described Model and Radii dialog.
Usually you will use transparency to get the superimposing model translucent and use a factor of about 0.2 to 0.5 (default).
Reference: biphenyl-2-carboxylic acid Author(s) Dobson, Allison J., Gerkin, Roger E. Title Biphenyl-2-carboxylic Acid: a Layered Structure Journal Acta Cryst. (1998). C54, 795 - 798
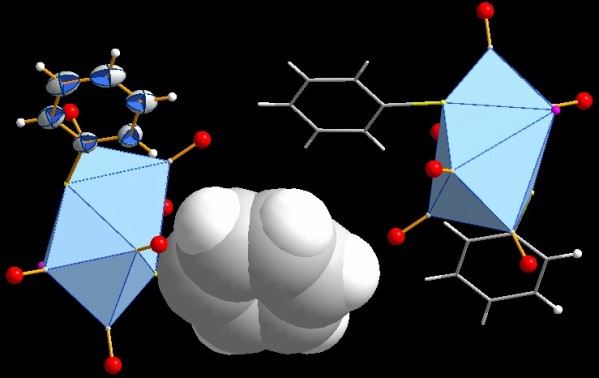
Individual assignment of modelsThe models ball-and-stick, wire, space-filling, and ellipsoid can be assigned to individual atoms or groups of atoms rather than defined globally. This allows to mix different models within one structure picture.
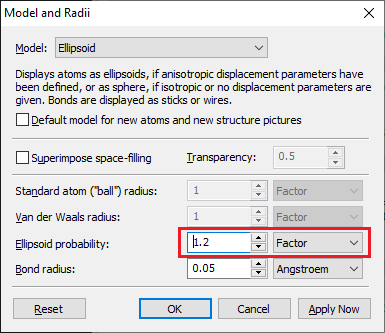
The most common way to use different models may be to show different molecules in the picture or maybe different symmetry-equivalent molecules with different models, e.g. like in the above picture. To select all atoms belonging to a molecule, click on an atom in the picture (or in the table of created atoms for instance) and use the command Select Molecule from the Edit menu or simply the Ctrl+M acceleration key. (For more selection techniques read the article "Selecting objects".) Then assign the model with the help of the Picture toolbar as described above or use the Model and Radii command from the Display menu. The latter has the advantage that you can also change atom and bond radii or ellipsoid sizes by a factor (see below). Scaling all or selected atoms' or bonds' radiiIn the Model and Radii dialog, you can use the input fields for atom and bond radii or for the ellipsoid probability. But rather than defining absolute values you can define a scaling factor. This is especially useful, if the selected atoms and/or bonds have different radii - what is the typical case, if the selected moiety describes a molecule consisting of different elements. In the screenshot below we change the probability values, given in percent, of all atoms of a molecule, which are displayed as ellipsoids by a factor 1.2 (i.e. increase the ellisoids). Please note: This kind of scaling radii replaces the overall radius factor that was used in older Diamond versions where the model could not be assigned individually but was a global setting.
Previous article: Rendered and flat representation |
|
Page last modified August 24, 2023. Copyright © 2023 Crystal Impact GbR. All rights reserved. Contact Webmaster |