|
|
||||||
|
|
|
|
Download | |||
Diamond Version 5 User Manual: Exploring bonding and contact spheresOverview
This article is an overview about
the "Exploration view", a special mode that has been introduced in Diamond version 5 to explore bonding spheres as well as contact spheres and H-bonds:
Previous article: Neighbouring preview of atoms and molecules around the atom (molecule) under mouse cursor How and when to use Exploration ViewThe Exploration view is a valuable addition to Diamond to study bonding spheres as well as spheres for non-bonding contacts and H-bonds in a manner that is more interactive than just shifting sphere boundaries in distances histograms in the Connectivity and Atomic Environments dialog windows. The changing of spheres in a distances histogram or distances table is immediately reflected in the structure picture, and adding or removing a bond or contact in the structure picture is directly reflected in the histogram and table. The typical situation is to start the exploration for a structure where bonding and/or contact spheres are not clear. Or you want to discover intramolecular or intermolecular contacts and H-bonds. The easiest way is to start from a blank picture. The basic functions to add atoms, build molecules, or to fill the unit cell are available directly from the Exploration view. Alternatively you can use one of the automatic picture creation functions that create a proposed building or use a user-defined building and design scheme to let Diamond create a picture and then enter the Exploration view. It is possible - but not recommended - to enter the Exploration view with a lot of individual design changes already made, such as labels, planes, polyhedra and other objects (which are not supported in the graphics view of the Exploration view). The Exploration view has a functionality to backup and restore individual picture designs, which tries to save most of your individual work - but due to the amount of changes to your picture building the restored picture may not look as you may expect after returning to the regular Picture Edit view. Limitations Due to the focus on studying bonding and contact spheres as well as H-bonds,
most of the picture designing functions of the regular Picture Edit view are not available here: Activating this view modeThe Exploration view can be activated from both Picture Edit view and Thumbnails Preview. If you start from Thumbnails Preview, a single thumbnail must be marked as selected. Starting a picture exploration There are several ways to start a picture exploration - with a dialog offering several options or directly (without dialog) by using default settings:
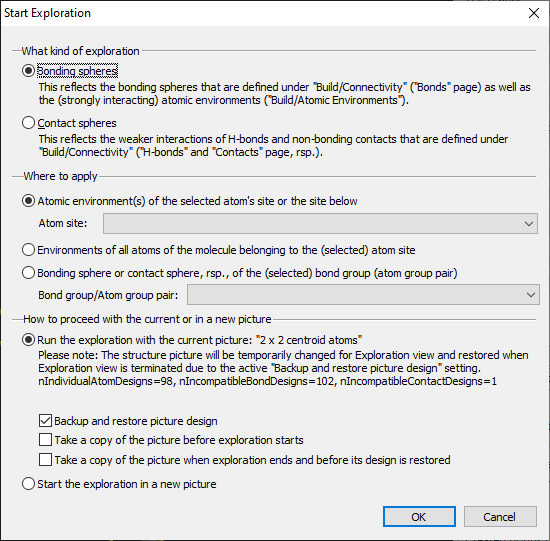
The command in the Picture menu runs the Exploration dialog (see below), whereas the toolbar button and acceleration key skip this dialog but use default or latest values instead. The kind of exploration (bonding or contact spheres) as well as which atoms and bonds/contacts to apply is taken from the latest used options stored in the Windows Registry. The exploration is performed with the current picture object anyway. Continuing a picture exploration You can interrupt a picture exploration and return to the Picture Edit view or Thumbnails Preview (where you have started from). If you want to continue the exploration, you can use the separate Continue Exploration command in the Picture menu. (This command is only available, if an exploration has already begun for the current picture object, otherwise it is grayed.) In this case the Exploration View directly begins without displaying a dialog. When you use the above mentioned toolbar button or the acceleration key, you will return to the previously begun exploration, i.e. in this case button and acceleration key continue the exploration automatically. If you want to start a new exploration - rather than continue where you interrupted before -, you have to use the Start Exploration command from the main menu instead. Start Exploration dialogThe Start Exploration dialog is the central entry point for a structure exploration and defines the initial settings for the exploration, i.e. what property to study and where to apply and if to start in the current or in a new picture object.
What kind of exploration defines if to study bonding spheres or contact spheres and H-bonds. The next group of options, Where to apply, defines Nevertheless you can change the options where to apply your studies any time later in the Exploration view using the Exploration controller (see below). The third and last group, How to proceed with the current or in a new picture, shows options if to enter the exploration with the current picture object or if you want Diamond to create a copy. See below at "Using the current picture or a copy for the exploration" for details. Graphics view and exploration controllerThe Exploration view is a special view on top of the regular Picture Edit View or Thumbnail Preview. It hides most of the commands that are available in the menus and toolbars of the regular views to enable you to better focus on the exploration of bonding or contact spheres. For that it uses a special Exploration Controller window, which is by default docked at the left side of the graphics part of the Exploration view. The commands are available through context menu in the graphics view as well as from the Exploration Controller. To open a context menu in the graphics view, click the right mouse button. To open a menu in the Exploration Controller, click on the Actions button at the bottom of the controller or on the arrow on the right side of the Settings button.
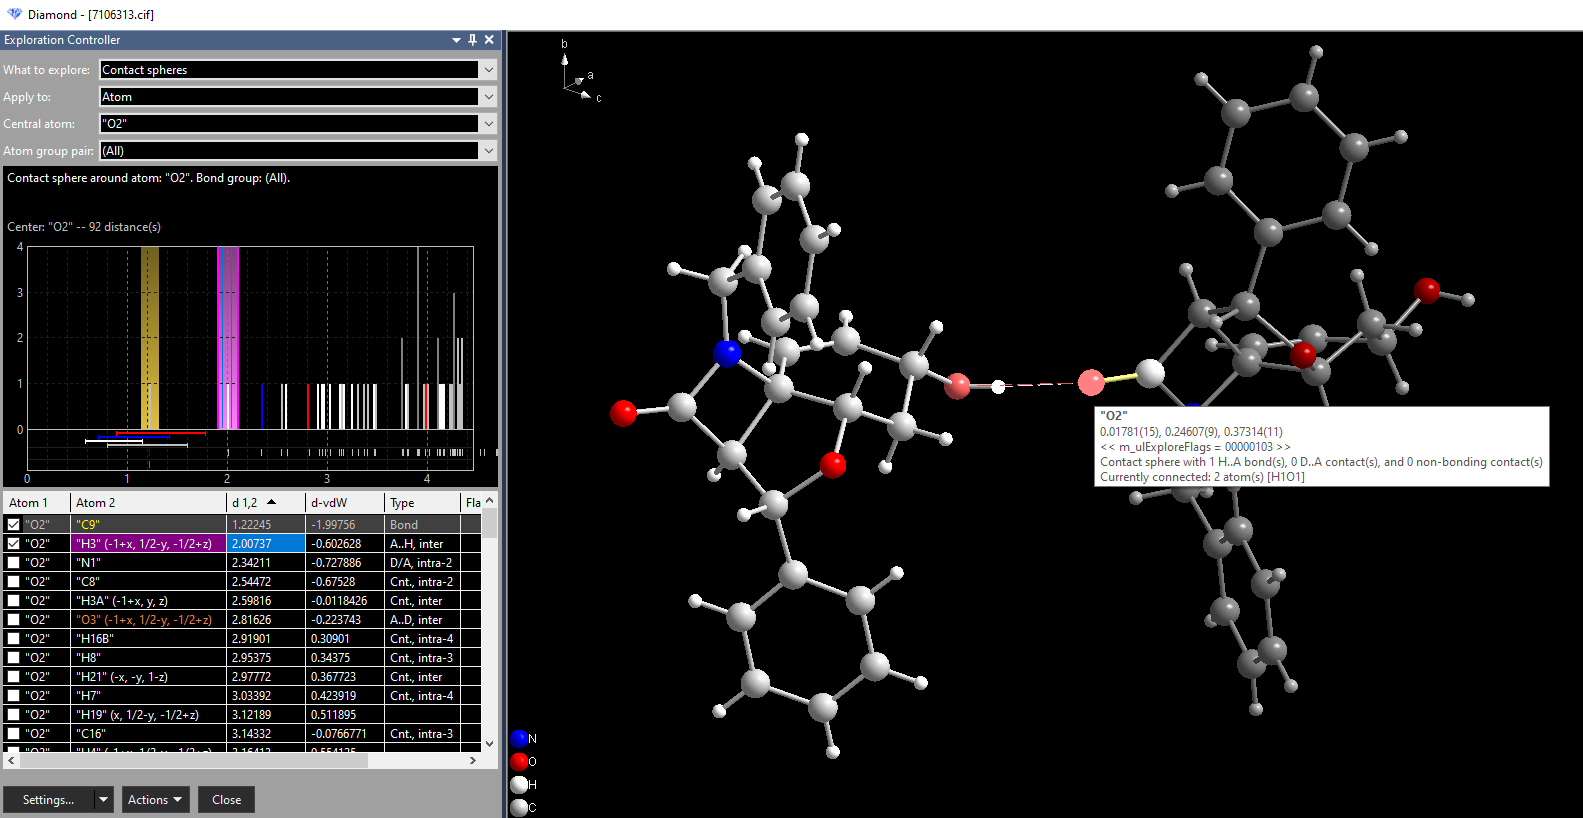
Screenshot of the Exploration view when studying the contact spheres around atom "O2" in COD sample structure 7106313. The atom is highlighted (glowing) in the graphics view as well as selected as "Central atom" in the upper part of the Controller window. The neighbouring atoms are listed in a distance table as well as in a distance histogram. Note that the main menu bar and the toolbars as well as data sheet or other tables are not available in the Exploration view. Exploration Controller The Exploration Controller docking window consists of four parts: The following article "Working in Exploration View" shows more details about the Exploration Controller. Starting from a blank picture or from an already built pictureYou can start your exploration of bonding spheres with a blank structure picture. Choose the central atom of interest in the Exploration dialog (and it will be created automatically) or in the Exploration controller any time later from the dropdown box Central atom and it will be added to the structure picture. Besides this, the most common building functions are available in the Exploration view - as there are the creation of a molecule (or molecules) from the atomic parameter list, the filling of the contents of the unit cell as well as the completion of fragments to molecules or the filling of incomplete coordination spheres with neighbouring atoms. The article "Working in Exploration View" explains all the commands that are available directly from the Exploration view. In principle, you can start the study of contact spheres from a single atom as mentioned before, but for contacts and H-bonds it will be more likely to study them from a molecule or molecular or polymeric fragment. You can prepare the molecule(s) or the polymeric framework in the Picture Edit view and then enter the exploration view - or you directly enter the exploration view with a blank picture and make use of the molecule creating and completing commands inside the Exploration view. In any case, you can start your exploration from a (manually or semi-automatically) built up structure picture - even when you already have made design changes to atoms and/or bonds or added labels etc.. See the article "Using Exploration view with an individidually designed structure picture" how to do this best. Using the current picture or a copy for the explorationBy default you will enter the exploration view with the current picture object: When running the command from the main menu, the option Run the exploration with the current picture is active by default. When running the command from the toolbar button or with the accelerator key (which skips the dialog), the current picture will be used anyway. Alternatively you can Diamond let create a copy of the picture and enter the exploration view with the copy. Using the original picture object or a copy has advantages and disadvantages, depending on the content of the picture - blank or just a few and simple atoms and bonds - or a sophisticated ensemble of individually designed atoms and bonds with labels etc. The reason is that, for the exploration view, Diamond makes some changes to the atoms' and bonds' designs to simplify the picture and to better focus on which atom belongs to which atom type and if a bond (or contact or H-bond) has been added to an atomic environment (which is shown as green tubes) or has been marked as "deleted" (non-bonding, which is shown as red tubes), for instance. You must take this into consideration when running the exploration with an already existing structure picture, especially when there is already some individual designs. To overcome this problem of individual designs, Diamond has the option Backup and restore picture design as checkmark in the Exploration dialog. This option is activated by default. You can switch the backup and restore of designs on or off in the dialog. When you enter the exploration view through the toolbar button or with the acceleration key, the picture is automatically backed up when entering and automatically restored when leaving the exploration view. When the Backup and restore picture design is active, Diamond makes a backup of all atoms' and bonds' designs, including models (such as ellipsoids etc.) before it enters the exploration view. After the (optional) backup, Diamond assigns all atoms designs of the atom types and designs all bonds as light grey tubes. When the exploration view is closing, the original atom and bond designs are restored, provided the Backup and restore picture design is active. When you decide to make use of the exploration with the Start the exploration in a new picture option in the Exploration dialog, the Backup and restore picture design option takes no effect (because the original picture is not touched for the exploration anyway). But please bear in mind, that changes you make to the connectivity and atomic environments during the exploration refer only to the new (copied) picture but are not copied back to the original picture. (Connectivity and atomic environments are properties of a picture object - not of the structure object like atomic parameters, bond parameters, cell parameters, and space group) Note: You have the possibility to make the restoring of the picture design undone after you have returned from Exploration view to Picture Edit view by using the Undo command from the Edit menu. See "Closing Exploration view" in the article "Working in Exploration View". What to explore in this modeThere are two different options what to explore in this special mode: The exploration of bonding spheres, that means strong interactions, which are stored in Diamond in the connectivity and in the atomic environments. These are described in detail in the article "Exploring bonding spheres". The exploration of weaker interactions, that means H-bonds and non-bonding contacts, is described in detail here: "Exploring H-bonds and contact spheres".
Previous article: Neighbouring preview of atoms and molecules around the atom (molecule) under mouse cursor
References: |
|
Page last modified April 04, 2023. Copyright © 2023 Crystal Impact GbR. All rights reserved. Contact Webmaster |