|
|
||||||
|
|
|
|
Download | |||
Diamond Version 5 User Manual: Exploring bonding and contact spheresWorking in Exploration View
This article describes how to work in Exploration view, especially in contrast to the regular Picture Edit view:
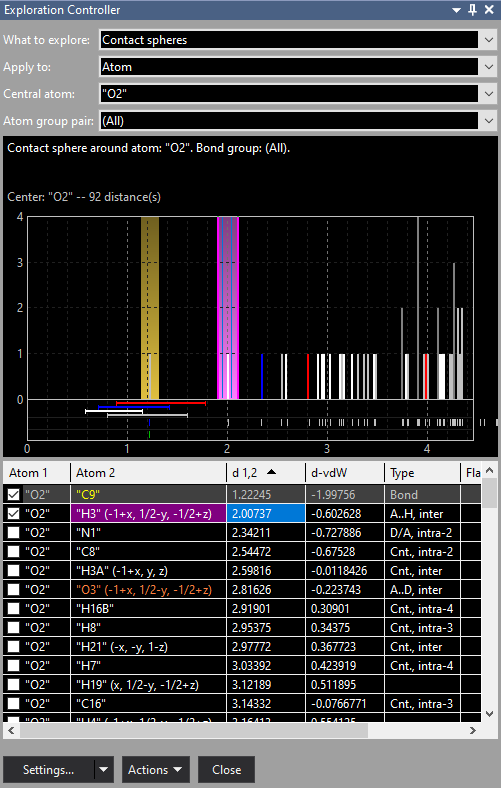
Previous article: Overview The Exploration ControllerThe Exploration Controller docking window consists of four parts: The selection of what to inspect, a distances histogram, a distances table, and buttons to choose settings as well as actions, e.g. build or complete a molecule in the graphics view. What to explore Apply to Central atom or Bond Atom group pair
Screenshot of Exploration Controller when studying the contact sphere around the atom "O2" in [...] Contact sphere is purple, the bonding sphere in contrast is yellow. The distances histogram and the table of neighbouring atoms depend on what is explored: bonding or contact spheres. These are described in more details in the following two articles "Exploring bonding spheres" and "Exploring H-bonds and contact spheres". The Settings button is still provisional in the current Diamond version. The Actions button opens a menu with several commands for building up the structural framework in the graphics view as wells as how to view and some additional helper functions. These are explained in more details below.
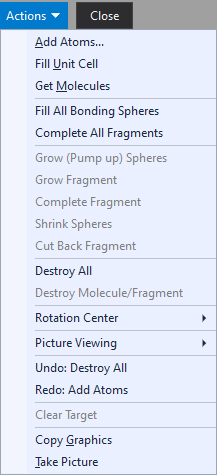
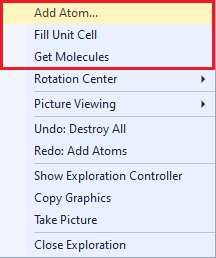
The Close button ends the exploration view and returns to the regular Picture Edit view (or to the Thumbnails Preview, if you launched the exploration from there). Creating a single atom or molecule or cell contentRegardless if you study bonding or contact spheres, there are several options where to start your studies from: The corresponding commands are available from the context menu of the graphics part (screenshot below) and from the Actions menu of the Exploration controller (screenshot above).
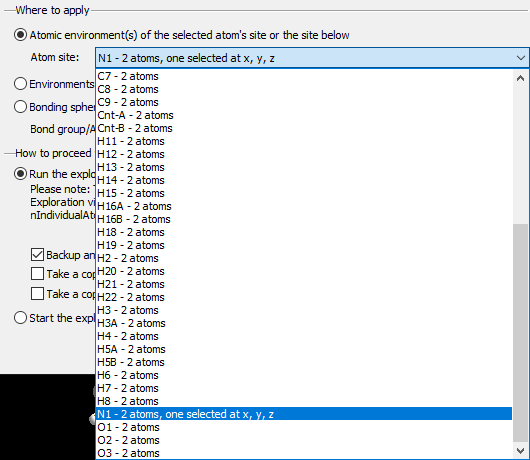
Add Atom(s) Get Molecules Fill Unit Cell Note: These basic building functions are a small subset of possible functions in Diamond to build up a structure picture manually. These are available in the regular Picture Edit view and are described in detail in the chapter Building up structural parts of this manual. Choosing a target to studyIf your structure picture that you use for the exploration already has atoms, you can choose the atom (or bond or contact), whose bonding or contact sphere you want to study, in the Exploration Controller (as mentioned above) or from the context menu of the graphics view. If an atom or a bond or contact is already marked as selected in the Picture Edit view, this will automatically be chosen as target when you enter the Exploration view. If you go through the Start Exploration dialog (see the previous article "Overview"), the object is selected in the dialog but you can choose a different one.
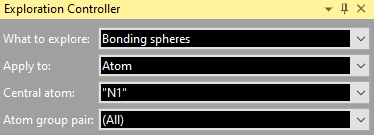
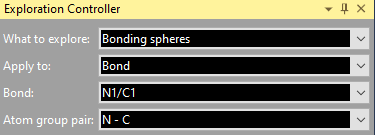
Regardless, if you come directly to the Exploration view through toolbar button or acceleration key of from the Start Exploration dialog, the selected atom or bond, rsp. is given in the Exploration Controller under Central atom and Bond, rsp. Apply to gives you the option to choose the whole molecule, which the reference atom or bond is part of, so you can see all contacts/H-bonds of a molecule. If you study bonding spheres rather than contact spheres, it may be reasonable to make a restriction under Atom group pair.
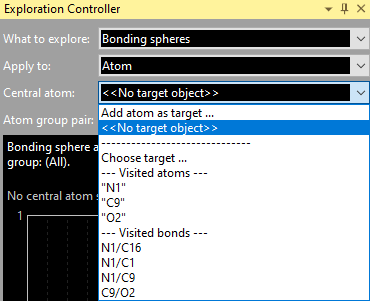
You can choose an atom or bond (or contact) that you have chosen as target before or "visited" before, even if you left the Exploration view in between and have returned later. "Visit" means that you move the mouse cursor over an atom or bond (or contact) and Diamond shows you infos about the object under the mouse cursor, such as atom label (or labels of the connected atoms, rsp.), the atomic coordinates (or interatomic distance, rsp.) and composition of the current atomic environment.
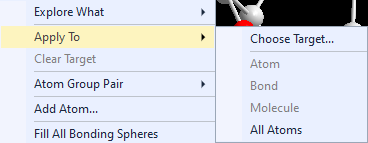
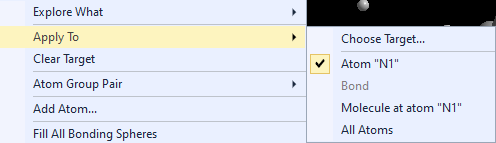
The context menu of the graphics view offers the options of the Exploration controller at the top (below "Explore what"
where you decide between bonding and contact spheres) in the Apply to sub-menu:
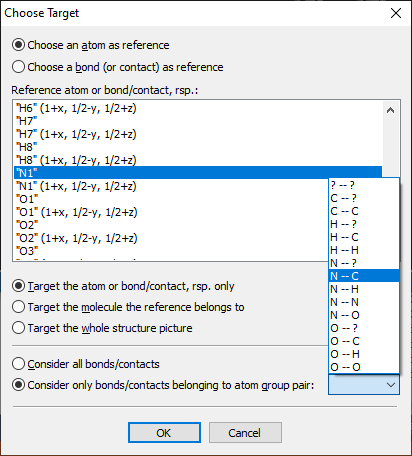
Choose Target dialog
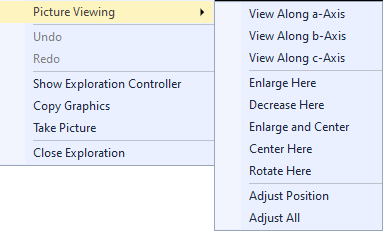
Atom group pair Rotating, shifting, and scaling your pictureRotating, shifting, and enlarging/decreasing with the mouse is handled like in Grab mode, which is known from the Picture Edit view. (The original Grab mode offers more options, see the article "Grab mode".) Rotating the structure Shifting the structure Changing the enlargment factor Commands to set or change the center of rotation These are available through the Rotation Center sub-menu of the graphics view's context menu or the Exploration controller's Actions menu:
About automatic centering You may find it disturbing - in Exploration view more than in Picture Edit view - when there is an incomplete molecular or polymeric fragment and the structure slips to the side when you add atoms, e.g. when filling incomplete coordination spheres or completing the fragment to a molecule. Then you can or should disable the automatic centering by clearing the checkmark in the Automatic Centering command. The options for automatic centering are treated separately for Picture Edit view and Exploration view. Putting the rotation center into an atom The command also works for bonds and contacts. In this case the coordinates of the center of the bond/contact are taken. Resetting the rotation center Commands in the Picture Viewing sub-menu of the context menu The Picture Viewing sub-menu of the graphics view's context menu or the Exploration controller's Actions menu contains commands dealing with viewing directions and picture adjustment:
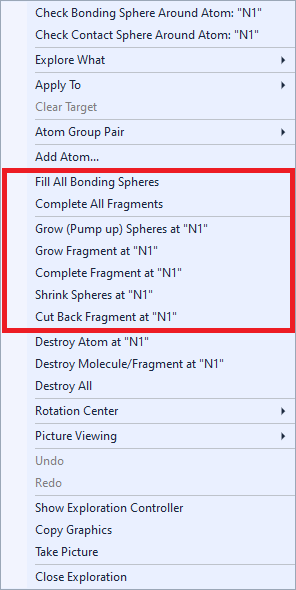
Viewing along an axis Adjusting Enlarging or decreasing at a certain atom's position Moving the clicked position into the center Rotating and object to the front Note: This article touches only a part of structure picture viewing options in Diamond. More details (but referring to regular Picture Edit view) are available from the articles Projection and Orientation and Position. Growing or shrinking spheres around atomsProvided that are already atoms in the structure picture, the context menu of the graphics view offers additional commands to add (or remove) atoms regarding the current bonding conditions. (In the Exploration controller's "Action" menu these commands are disabled (grayed) when there are no atoms yet.)
The Fill All Bonding Spheres command completes all bonding spheres around all atoms of the current structure picture. This means, every atom of the structure picture is checked, if all of its bonding neighbouring atoms are present. Missing neighbouring atoms are added, if necessary. This command runs only one cycle, which means that it does not necessarily complete an incomplete fragment to a molecule - as the below mentioned "Complete fragments" functions do. The command Grow Spheres at "(atom label)" "grows", which means completes, the bonding sphere around the atom under the mouse cursor, if the context menu has been called for a clicked atom. It "grows" the sphere of the reference atom, if a reference atom is defined but no atom under the mouse cursor. This "growing" is also know as "pumping up", since it checks subsequent spheres, if the current enclosure sphere is already complete - up to the outmost bonding sphere. This works even if there are already one or more completed coordination spheres around the actual central atom. In contrast to "Grow Spheres", the command Grow Fragment at "(atom label)" regards the whole fragment where the atom "(atom label)" belongs to. It can be used to grow a polymeric part of a structure or an (already) incomplete molecular fragment. "Grow Fragment" performs only one cycle, i.e. completes only the farmost incomplete bonding spheres, but this does not necessarily yield to a complete molecule. The command Shrink Spheres at "(atom label)" works the opposite way as Grow (Pump up) Spheres. It "shrinks" a bonding sphere, i.e. removes the atoms from the farmost bonding sphere of the atom "(atom label)". Completing molecular fragments or cutting back moleculesThe Complete All Fragments command completes all fragments in the structure picture to complete molecules, if possible. If at least parts of the structure are polymeric, it stops the operation after several cycles. The command Complete Fragment at "(atom label)" completes only the fragment where the atom under the mouse cursor or the reference atom belongs to rather than all fragments. The command Cut Back Fragment at "(atom label)" works the opposite way as "Grow Fragment" (see above). Here Diamond looks for the outmost atoms of a polymer or molecule (or molecular fragment) and destroys them. Removing atoms and bondsThe Destroy commands from the context menu and from the Actions menu can be used to get rid of one or more atoms or of whole fragments, molecules or even the whole content of the structure picture. To remove the atom under the mouse cursor, run the command Destroy Atom at [...]. The atom is removed together with associated bonds, contacts, and H-bonds. The command is also available, when there is no atom under the mouse cursor but a reference atom is defined. In that case, the command removes the reference atom, with the consequence that no target is defined after. The related command Destroy Bond at [...] removes the bond mentioned after "at" or similar objects like a contact or H-bond but not the connected atoms themselves. The command Destroy Molecule/Fragment at [...] removes the whole molecule where the atom or bond mentioned after "at" belongs to. This can also be an incomplete molecular or polymeric fragment. Finally, the command Destroy All removes the complete contents of the active structure picture, i.e. all atoms, bonds, contacts, and H-bonds. Taking or copying an image of the pictureYou can use the command Take Picture (context menu or Actions menu) to create a new structure picture object as a complete copy of the current picture. (While the new picture is dropped, you will continue working with the current picture in the Exploration View.) The dropped picture may be used later (after returning from the exploration) for publishing or as a starting point for later exploration and improvements. (Or simply delete it when it is not more of interest.) You can let Diamond "take" a picture automatically immediately before the exploration view begins, if you launch the exploration through the Start Exploration command in the Picture menu and set the checkmark at Take a copy of the picture before exploration begins in the Start Exploration dialog. If you have launched the exploration through the Start Exploration command of the Picture main menu and the setting Take a copy of the picture before exploration ends was activated in the Start Exploration dialog, a copy of the picture with the designs of the exploration will be dropped ("taken") automatically before the designs are restored (if the Backup and Restore option was activated). (Note: More options to take a picture are available in the Picture Edit View: See the article "Deriving new pictures".) Copying an image Closing Exploration viewThe picture exploration view can be closed with: Both the Close Exploration command and the Close button terminate the current exploration (of bonding or contact/H-bond spheres) and return to the (regular) Picture Edit view, if you started the exploration from the Picture Edit view, and to the Thumbnails Preview, if you started from there. Since the atom and bond design of the structure picture has been backed up when entering the exploration view, this design will be restored when you leave the exploration. Note: The design is not restored, if you have launched the exploration through the Start Exploration command of the Picture main menu and have cleared the checkmark at Backup and restore picture design in the Start Exploration dialog. (Backup and restore of design is activated by default in the dialog. When you use the toolbar button or the acceleration key, the design is backupped and restored anyway.) You can make a restore of design undone using the Undo command from the Edit menu when you have returned from Exploration view, if you want to keep the design changes that the exploration view applied to the structure picture.
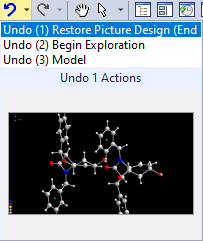
Screenshot of the dropdown list at the Undo button to make a previous Restore Picture Design undone. If you click on "Undo (1) Restore Picture Design (End Exploration)", your changes done during the exploration leave unchanged and the design shown during the exploration is restored. If you click on "Undo (2) Begin Exploration", all changes made in the exploration will be discarded.
Previous article: Overview
References: |
|
Page last modified April 03, 2023. Copyright © 2023 Crystal Impact GbR. All rights reserved. Contact Webmaster |