|
|
||||||
|
|
|
|
Download | |||
Diamond Version 5 User Manual: Automatic, assisted, and manual picture creationDeriving new picturesUse "Take picture" and "Continue with new picture" to improve your work flow of creating pictures
This article is about:
Previous article: Optimizing the Representation of the Structure Picture Creating a new blank pictureThe easiest way to create a new blank picture is to either use the toolbar button in the main toolbar
or the corresponding hotkey Alt+Ctrl+N. Note that the contents of the current structure picture, the current orientation as well as the design of the objects present (atoms, bonds etc.) are not copied. The settings of rendering, background color, perspective etc. for the new picture will be taken from the Windows registry settings. To create a picture that is blank at the beginning but take over all the connectivity and atomic environment settings as well as the design settings, orientation etc. that you have defined for the current picture, you should instead use the command Copy To New Picture from the Edit menu or the corresponding toolbar button or the hotkey Alt+Ctrl+C:
Ensure that no atom, bond or other object is selected in the source picture, otherwise these selected objects will be copied to the target picture (see below).
Creating a new picture with the selected atoms, bonds, etc.To create a new picture containing (a copy of) the selected parts of the active structure picture use the above mentioned Copy To New Picture command from the Edit menu (or the mentioned toolbar button or hotkey). Choose Select All from the Edit menu, if you want to copy the entire picture. (Note: To copy the entire picture, it is easier to use Take Picture or Continue With New Picture instead, see below.) If nothing is selected in the source picture, the target picture is blank but uses the same settings for representation, orientation, designs etc. Note that the latter case is not equivalent to the hotkey Alt+Ctrl+N described above, as the current settings of orientation and object designs are not copied with Alt+Ctrl+N, see above!
Using the New Structure Picture AssistantYou can use the command New Picture... from the Picture main menu to launch the New Structure Picture Assistant that guides you step by step in creating another picture for the current structure dataset. You can either create an empty picture or copy the contents of an existing picture. Besides this, you can select what you would like to do with the new picture: Let Diamond create a proposal of a structural model from analysis of the structure parameters, launch the "Structure Picture Creation Assistant" (so that you can create a structural model on your own guided by Diamond), or even do nothing for the moment (leave it as it is). Use the Next button to proceed from the "Welcome page" of the assistant to the second page that shows you the options where to start from:
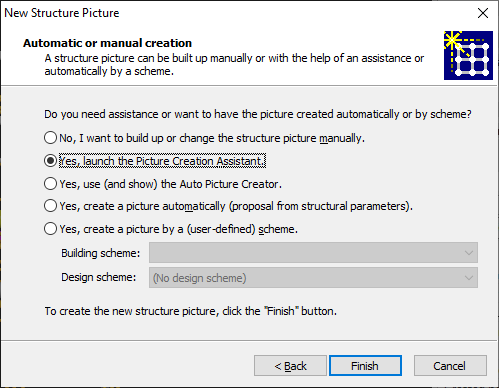
Starting a new picture from scratch Creating a copy of an existing picture The Next button brings you to the third and last page of the assistant, where you choose, if to build up your new structure picture manually or from a user-defined scheme or guided by Diamond:
No, I want to build up or change the structure picture manually
Yes, launch the Picture Creation Assistant
Yes, use (and show) the Auto Picture Creator
Yes, create a picture automatically (proposal from structural parameters)
Yes, create a picture by a (user-defined) building scheme The new structure picture will be created when you click the Finish button.
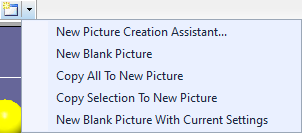
Creating new pictures from the tab barIf the Picture Tab Bar is activated, there is a symbol right beneath the last (rightmost) tab, followed by a dropdown icon, see screenshot below. The Picture Tab Bar described in the article "Side-by-side Structure Picture Editing".
Clicking on the tab button creates a new picture as an exact copy of the current picture, with a default title "Picture" followed by a number. Clicking on the dropdown symbol right beneath the tab button opens a menu with the following commands:
New Picture Creation Assistant...
New Blank Picture
Copy All To New Picture
Copy Selection To New Picture
New Blank Picture With Current Settings
"Take Picture" and "Continue with New Picture"The two commands Take Picture and Continue With New Picture have been added in version 5 to improve the workflow in creating multiple pictures for a structure data set each. Both commands create a new structure picture object as a complete copy of the current picture. The difference is that in case of Take Picture the new picture is dropped, while you continue to work with the current picture. The dropped picture may be used for publishing or as a starting point for later exploration and improvements. (Or simply delete it when it is not more of interest.) On the other hand, with Continue With New Picture you continue to work with the new ("taken") picture rather than with the current picture. Both commands can be called from the Picture menu and open a dialog where you can define the following settings:
- The general title prefix that will be used to create new pictures with the Take Picture or Continue With New Picture command, rsp. The toolbar button in the main toolbar
or the hotkey Alt+Ctrl+K create a new picture in the same way as the Take Picture command from the Picture menu but skip the above mentioned dialog. The title is generated automatically from the title prefix (that you can edit when calling the dialog). The comment is copied, if the corresponding check mark is set in the dialog. A new tab is created or not, depending from the checkmark in the dialog. There is a corresponding toolbar button and the hotkey Alt+Ctrl+W for the Continue With New Picture command skipping the dialog:
Previous article: Optimizing the Representation of the Structure Picture
|
|
Page last modified October 03, 2023. Copyright © 2023 Crystal Impact GbR. All rights reserved. Contact Webmaster |